IPv4
From $0.50 for 1 pc. 38 countries to choose from, rental period from 7 days.
IPv4
From $0.50 for 1 pc. 38 countries to choose from, rental period from 7 days.
IPv4
From $0.50 for 1 pc. 38 countries to choose from, rental period from 7 days.
IPv6
From $0.07 for 1 pc. 14 countries to choose from, rental period from 7 days.
ISP
From $1.35 for 1 pc. 23 countries to choose from, rental period from 7 days.
Mobile
From $14 for 1 pc. 17 countries to choose from, rental period from 2 days.
Resident
From $0.70 for 1 GB. 200+ countries to choose from, rental period from 30 days.
 Armenia
 Australia
 Belgium
 Brazil
 Bulgaria
 Canada
 China
China
 Czech
Czech
 England
 Finland
 France
 Georgia
 Germany
 Hong Kong
 India
India
 Indonesia
 Italy
Italy
 Japan
Japan
 Kazakhstan
 Korea
Korea
 Latvia
 Lithuania
 Malaysia
 Mexico
 Netherlands
 Poland
 Portugal
 Romania
 Russia
 Singapore
 South Africa
 Spain
Spain
 Sweden
 Switzerland
 Thailand
 Turkey
 Ukraine
 USA
USA
Use cases:
Armenia
Australia
Belgium
Brazil
Bulgaria
Canada
China
Czech
England
Finland
France
Georgia
Germany
Hong Kong
India
Indonesia
Italy
Japan
Kazakhstan
Korea
Latvia
Lithuania
Malaysia
Mexico
Netherlands
Poland
Portugal
Romania
Russia
Singapore
South Africa
Spain
Sweden
Switzerland
Thailand
Turkey
Ukraine
USA
Use cases:
Tools:
Company:
About Us:
Armenia
Australia
Belgium
Brazil
Bulgaria
Canada
China
Czech
England
Finland
France
Georgia
Germany
Hong Kong
India
Indonesia
Italy
Japan
Kazakhstan
Korea
Latvia
Lithuania
Malaysia
Mexico
Netherlands
Poland
Portugal
Romania
Russia
Singapore
South Africa
Spain
Sweden
Switzerland
Thailand
Turkey
Ukraine
USA
Using multiple proxies is common, but it can pose risks to online privacy and security. With increasing threats such as hackers and tracking cookies, users need effective tools to protect their data and browsing activity. FoxyProxy for Chrome is a solution that stands out as a powerful extension that simplifies proxy management. It routes browser traffic through secure servers, masking the IP address. It gives users control over which sites use specific intermediaries. This also enables seamless switching between multiple configurations. So, you get the ability to access the internet safely.
If you want to compare how proxy configuration works in other browsers before setting up FoxyProxy, you can take a look at Firefox proxy settings, which follow similar principles but offer browser-native controls.
The following section explains how to set it up, covering all key steps and configuration details. It covers key features and highlights the opportunities it offers for better online security and unrestricted browsing. If you're interested in understanding how proxy mechanisms work on a deeper level, you might want to read more about how CGI proxies operate here.
Let’s begin with the basic understanding. FoxyProxy for Chrome is a browser extension. It is popular among users to manage their intermediaries. The automation it offers for handling is a need of the modern age. Any user can experience that this extension eases the whole process of connecting with multiple IPs. With the help of this tool, anyone can access the internet securely. This is nothing like standard browser proxy settings. The plugin includes several advanced features. For example:
Furthermore, FoxyProxy is a compatible solution with major browsers. A few examples are Chrome, Firefox, and Edge. With the compatibility with such browsers, it becomes a versatile option. It means FoxyProxy can be used for personal and professional use. For instance, IT professionals and digital marketers use it to manage multiple network connections.
And if you want to compare FoxyProxy with other solutions, you can also read an article about configuring proxies in alternative privacy-focused browsers here. It gives broader context on how proxy tools behave across different platforms.
Now let’s focus on how FoxyProxy for Chrome works. It operates by intercepting browser traffic. The plugin redirects this traffic through selected servers. The users can easily configure different IPs. It is possible by specifying which website or URLs must use a particular server. You will experience that this extension automatically applies the right settings according to predefined rules. It eliminated the necessity for manual setup.
Moreover, this addon provides various features that make the usage more convenient. All of them, including switch toggles and IP address rotation, ensure secure and anonymous browsing. So, the results of FoxyProxy operations simplify the server management. It provides you with the granular-level control.
Also, you can explore another way to automate proxy switching in Firefox, here is a useful guide on configuring proxies in the Proxy Switcher and Manager extension.
There is no doubt in the fact that FoxyProxy for Chrome is a powerful extension. It enhances your server handling and overall browsing. This addon supports different protocols. For example, HTTP, HTTPS, SOCKS, and FTP. Also, it offers various features. Some are listed below:
The first feature is the simple approach to installing it. Any user can download it using the Chrome Web Store. That’s it. Start using it immediately. You will not require any extra software or plugins here. Once you install it, the new profiles become easy to add. They will appear in your convenient menu on the browser toolbar.
It also offers you a facility to customize. You can make adjustments to the interface as you want. You can easily change the themes and colors as you want. You can also pick the fonts and layouts of your choice. It will help you to suit your personal preferences. It will help you navigate intuitively. Thus, everything will be visually comfortable.
Another feature that is obvious is the effective management of different intermediaries. It enables you to create and handle various profiles. Each one may have unique settings. This allows for easy switching between different locations or purposes. Besides, the profiles can be imported or exported. It streamlines the use across devices.
Also, the users can set their rules for particular domains, URLs, or IP addresses. With this extension, you can automatically redirect or block websites. Everything will go according to the rules you will set. Besides, there is a facility of auto-switch feature. It ensures the optimal protocol selection. It provides you seamless browsing without manual adjustments.
The following are the main steps for how to use FoxyProxy on Chrome:
1. First, you need to open the browser. And now, move to the Menu. You can do it by clicking on the three dots you can see in the upper right corner.
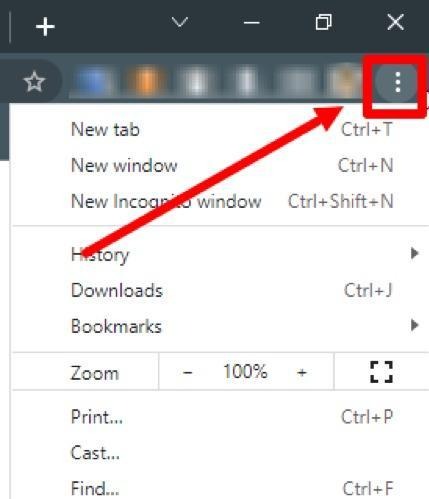
2. In this step, go and hover over More Tools. And then, open the Extensions tab.

3. You can see three bars on the left. Click it.

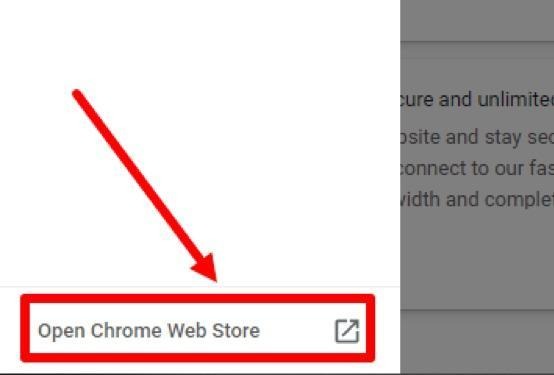
4. Now, choose the section of the Open Chrome Web Store.
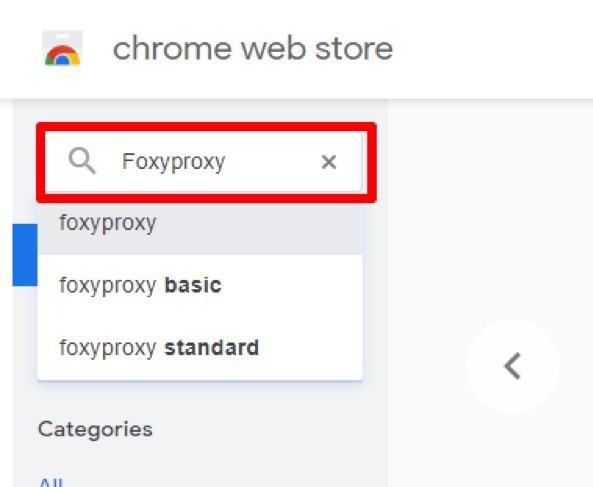
5. Now, type FoxyProxy in the search bar of your Google Chrome store. And then, hit Enter.
6. In this step, choose the first extension. And next, click on the Add to Chrome button.


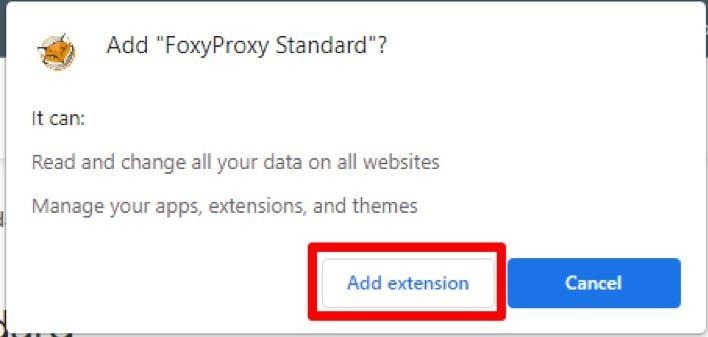
7. Now, you see a pop-up window. Here, you need to select the Add extension.
8. Finally, you now install FoxyProxy Chrome. A user now steps ahead to set up the proxy. So, click the icon of the plugin. And then choose Options.

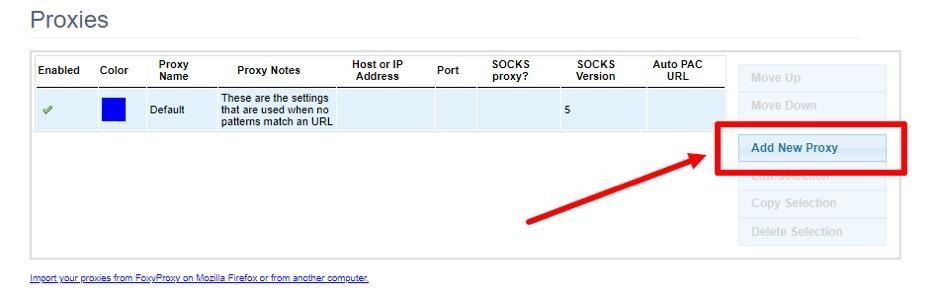
9. Here is the step where you move to the Proxies section.

10. Now, hit the Add New Proxy button.
11. You can now type any server’s name in your General tab.

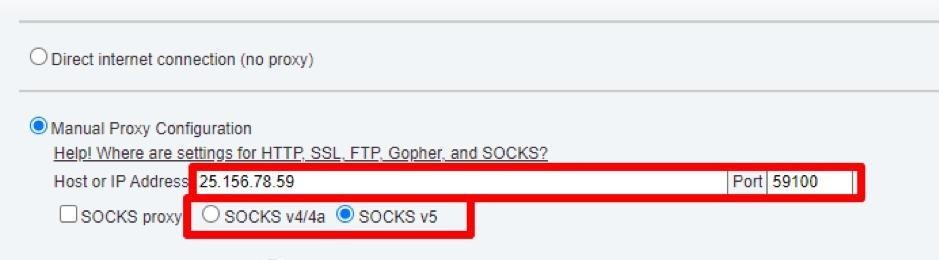
12. Next, open the tab of Proxy Details. Now, check the box of Manual Proxy Configuration.

13. Here, you need to enter the IP address and port. Remember to choose the server type.
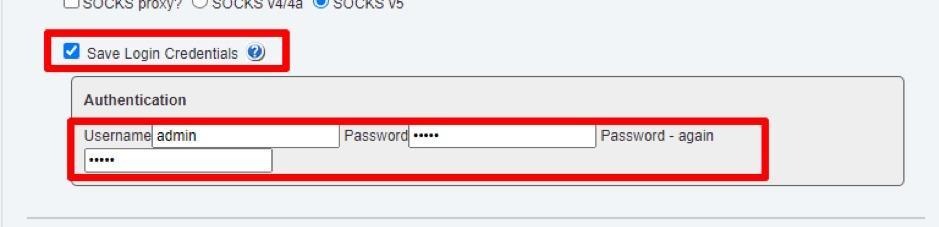
14. Now, keep a check on the box that you see in front of Save Login Credentials. And then, enter the Username and Password.
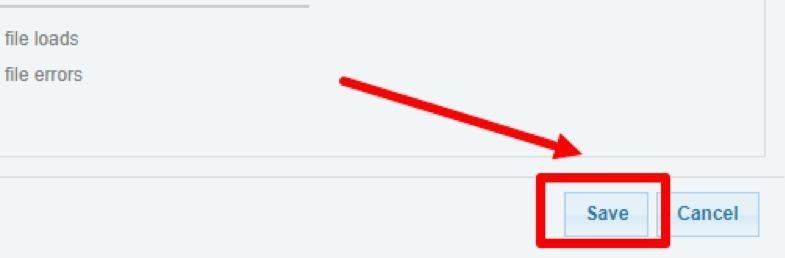
15. Finally, hit the Save button.
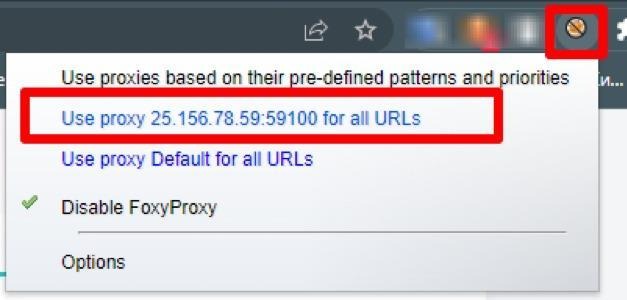
16. Lastly, click the plugin’s icon. Afterward, choose the server that you added.
If you want to see another extension option, check here for the steps for setting up a proxy in the Simple Proxy.
FoxyProxy for Chrome is an exceptional tool. But still, there are some users who have reported some issues using it. So, it is a good idea to learn about common problems. These may help you to troubleshoot them if you encounter any. Let’s check a few!
Finally, you can see that when you systematically identify and address these common challenges, you can use this addon without any problem.
Ultimately, you can see that FoxyProxy for Chrome is versatile. It is a user-friendly tool. With the benefits like automating IP switching and customizing rules, it improves online security and browsing flexibility. So, your reason may be protecting your privacy or managing complex network environments. It streamlines the process and ensures reliable performance. Both beginners and experts find it suitable to use with its intuitive interface and advanced features.
If you want to have an interactive way to learn the configuration, check this Video Tutorial. It has all the essential information in an engaging way to help you with setup.
 Instagram
  Facebook
  TikTok
  Telegram
  YouTube
  Twitter
  Tinder
  Reddit
  LinkedIn
  Runescape
  Dofus
Dofus  Metin2
  Silkroad
  Margonem
  Minecraft
  Lineage 2
  WoW
WoW  Lords Mobile
  Travian
  Steam
Steam  Origin
  Google
  ScrapeBox
  Amazon
  Ebay
Ebay  Shopify
  Etsy
Etsy  Netflix
  Spotify
  Twitch
  Browsing


