IPv4
From $0.50 for 1 pc. 38 countries to choose from, rental period from 7 days.
IPv4
From $0.50 for 1 pc. 38 countries to choose from, rental period from 7 days.
IPv4
From $0.50 for 1 pc. 38 countries to choose from, rental period from 7 days.
IPv6
From $0.07 for 1 pc. 14 countries to choose from, rental period from 7 days.
ISP
From $1.35 for 1 pc. 23 countries to choose from, rental period from 7 days.
Mobile
From $15 for 1 pc. 17 countries to choose from, rental period from 2 days.
Resident
From $0.70 for 1 GB. 200+ countries to choose from, rental period from 30 days.
 Armenia
 Australia
 Belgium
 Brazil
 Bulgaria
 Canada
 China
China
 Czech
Czech
 England
 Finland
 France
 Georgia
 Germany
 Hong Kong
 India
India
 Indonesia
 Italy
Italy
 Japan
Japan
 Kazakhstan
 Korea
Korea
 Latvia
 Lithuania
 Malaysia
 Mexico
 Netherlands
 Poland
 Portugal
 Romania
 Russia
 Singapore
 South Africa
 Spain
Spain
 Sweden
 Switzerland
 Thailand
 Turkey
 Ukraine
 USA
USA
Use cases:
Armenia
Australia
Belgium
Brazil
Bulgaria
Canada
China
Czech
England
Finland
France
Georgia
Germany
Hong Kong
India
Indonesia
Italy
Japan
Kazakhstan
Korea
Latvia
Lithuania
Malaysia
Mexico
Netherlands
Poland
Portugal
Romania
Russia
Singapore
South Africa
Spain
Sweden
Switzerland
Thailand
Turkey
Ukraine
USA
Use cases:
Tools:
Company:
About Us:
Armenia
Australia
Belgium
Brazil
Bulgaria
Canada
China
Czech
England
Finland
France
Georgia
Germany
Hong Kong
India
Indonesia
Italy
Japan
Kazakhstan
Korea
Latvia
Lithuania
Malaysia
Mexico
Netherlands
Poland
Portugal
Romania
Russia
Singapore
South Africa
Spain
Sweden
Switzerland
Thailand
Turkey
Ukraine
USA
WinGate is an advanced software solution for managing internet access that combines proxy server functions, a gateway, firewall, VPN, as well as access control and traffic filtering systems. The program is designed for Windows and can act as a centralized internet access point for a single device or an entire local network. Using WinGate proxy expands its capabilities for the following groups of users:
In these scenarios, WinGate becomes not just an intermediary, but a full-fledged proxy gateway with flexible routing and the ability to connect external intermediary servers.
Direct integration (HTTP, HTTPS, or SOCKS) is required for:
As a result, the software solution is especially suitable for corporate environments where the proper setup of WinGate proxy servers ensures reliable security and flexible traffic distribution.
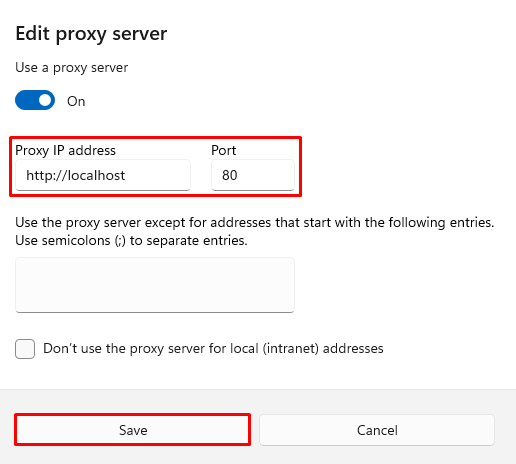
To access the program’s interface, you need to install it from the official website, launch WinGate Management, and select Localhost.
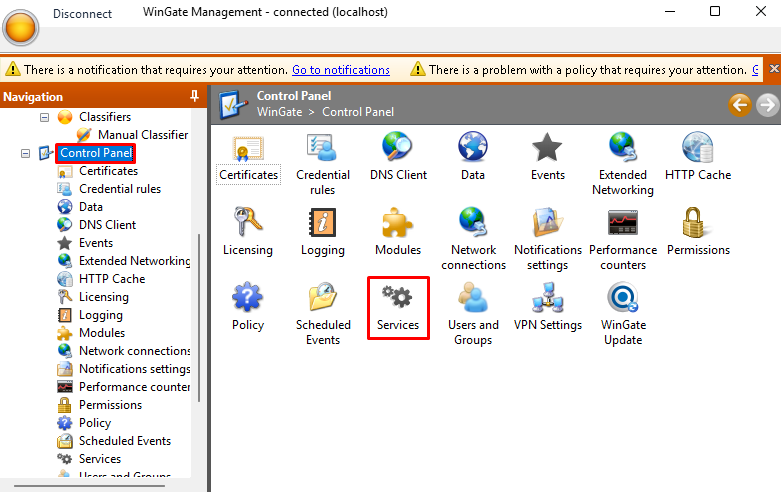
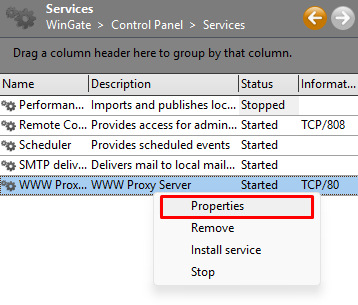

Thus, a properly configured WinGate proxy setup is successfully done. Now the software can be used for the following purposes:
Users can configure any type of intermediaries, including datacenter, ISP, mobile, and residential. Dynamic solutions can also be integrated, which are more suitable for automation tasks compared to static ones. Before starting to work with WinGate proxy servers, we recommend reading the review “Datacenter Proxies vs. Residential Proxies ”, where the key differences between them are explained, helping to make the best choice.
Thanks to its wide set of tools – from a built-in firewall to a DNS client, logging, authentication support, caching, and much more – WinGate can be used both in small businesses and within corporate LAN networks.
After successfully configuring WinGate proxy and verifying its operation, users gain the ability to flexibly manage clients, assign permissions, adjust services, monitor system performance, and establish detailed routing rules.
For most tasks in WinGate, it is better to use HTTP/HTTPS – they are simpler and more suitable for web services. The SOCKS5 protocol is chosen when it is necessary to redirect all application traffic that does not support HTTP.
By default, when setting up the software, a license must be activated. This can be a paid plan, a 30-day trial, or a free license. Each option provides the ability to integrate an intermediary server. Therefore, purchasing a paid plan is not mandatory.
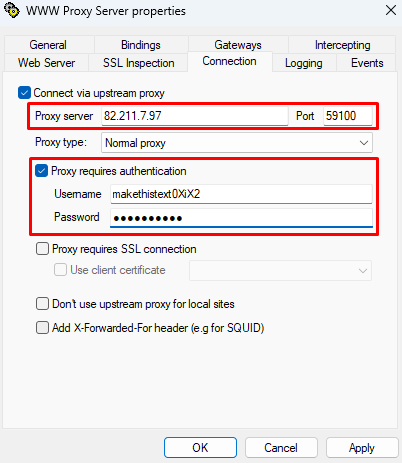
If you are using external proxies with rotation provided by the provider, no additional configuration in WinGate is required – just specify the new IP address and port. The application will connect, and the IP will automatically change according to the provider’s settings.
If a non-standard port is used (not 80, as in our example), make sure it is opened in the firewall and antivirus; otherwise, clients will not be able to connect to WinGate.
Yes, WinGate supports all types (datacenter, mobile, residential, private ISP proxies) if they work with HTTP(S) or SOCKS protocols and have stable IP and authentication.
 Instagram
  Facebook
  TikTok
  Telegram
  YouTube
  Twitter
  Tinder
  Reddit
  LinkedIn
  Runescape
  Dofus
Dofus  Metin2
  Silkroad
  Margonem
  Minecraft
  Lineage 2
  WoW
WoW  Lords Mobile
  Travian
  Steam
Steam  Origin
  Google
  ScrapeBox
  Amazon
  Ebay
Ebay  Shopify
  Etsy
Etsy  Netflix
  Spotify
  Twitch
  Browsing


