IPv4
From $0.72 for 1 pc. 37 countries to choose from, rental period from 7 days.
IPv4
From $0.72 for 1 pc. 37 countries to choose from, rental period from 7 days.
IPv4
From $0.72 for 1 pc. 37 countries to choose from, rental period from 7 days.
IPv6
From $0.07 for 1 pc. 14 countries to choose from, rental period from 7 days.
ISP
From $1.35 for 1 pc. 23 countries to choose from, rental period from 7 days.
Mobile
From $14 for 1 pc. 18 countries to choose from, rental period from 2 days.
Resident
From $0.70 for 1 GB. 200+ countries to choose from, rental period from 30 days.
Use cases:
Use cases:
Tools:
Company:
About Us:
Linux users need to set up solutions to manage network traffic and maintain privacy. Even if you are using Ubuntu or a headless server, the right Linux proxy settings can make sure you have control over data traffic.
Let’s look at the steps to configure Linux settings, the different types available, and configurations for both the GUI and terminal.
It connects your Linux system to the internet using a different IP address. This masks your real IP address and bypasses restrictions. But setting it up can be a problem for many, especially those who are unfamiliar with the OS. Users need to change their Linux proxy settings so that they can enjoy browsing while being anonymous. This is applicable if you’re wondering, “How to hide IP". They could also access any region-locked content and files that are behind a firewall. All in all, it’s used for safety on the internet.
There are different protocols supported, each having a different use:
Each type has a different purpose. For example, HTTP/HTTPS work well for general browsing. If you are routing traffic for multiple protocols, then SOCKS5 is preferred. For any purpose, it’s best to choose the top proxy providers.
You need to set up your Linux proxy settings the right way. A wrong configuration can lead to failed connections or authentication loops that can be annoying.
You can setup a proxy server on Linux with Ubuntu using the graphical user interface (GUI) or through the command line. Both work well.
If you use a desktop-based Linux distribution like Ubuntu GNOME, Linux Mint, or KDE Plasma, it’s best to use the GUI. You don’t need to have any command-line knowledge, and it can be used for quick network changes.
Here is how to change it through the GUI:
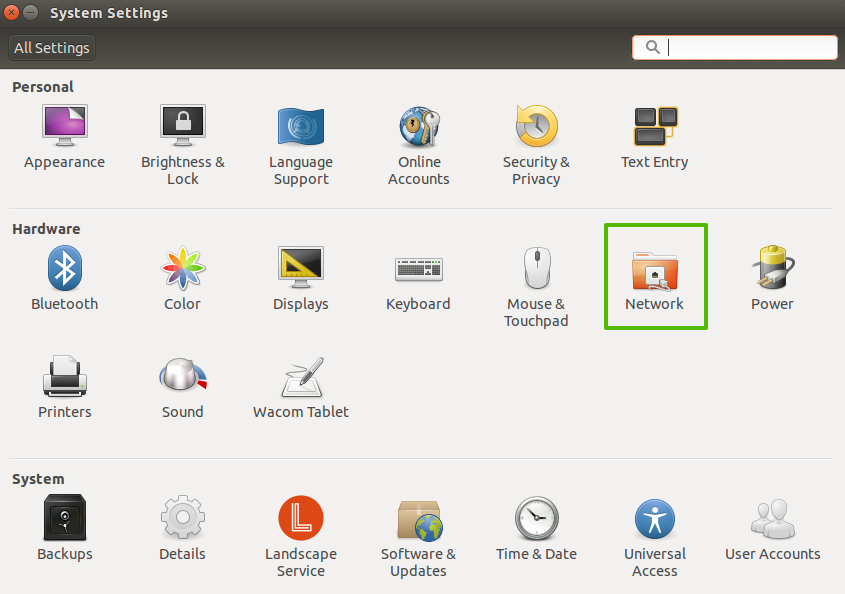
Step 1: Open the system menu in the top right corner. Select settings.

Step 2: Select Network to see all the available interfaces.

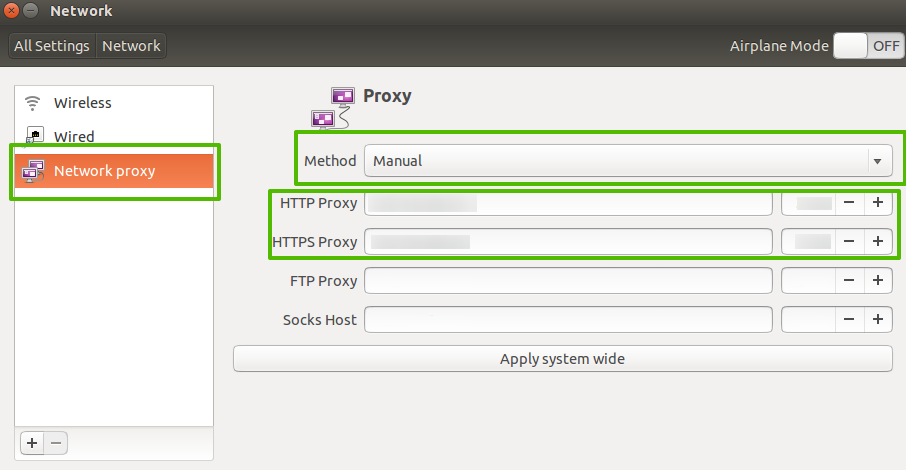
Step 3: Scroll down to the Network proxy section to configure your system for external connections. Select Manual from the drop-down. This will then reveal the fields to input the different types.

Step 4: Fill in the following fields based on your type:
Many desktop environments might require you to enter your username and password for authentication. Some might also require you to enter the credentials in URL format:
http://username:[email protected]:8080
Step 5: Enter the domains you want whitelisted in the Ignore Hosts field:
localhost, 127.0.0.1, ::1
Step 6: If you want to apply the settings to all programs, click on the “Apply System Wide” button. Some applications, like wget, apt, curl, etc., might require manual configuration. For a detailed Ubuntu-specific step-by-step guide, see our Ubuntu proxy settings tutorial.
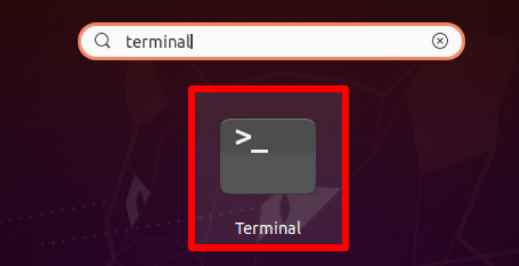
You can also configure these settings using the terminal for the current session, a user, or for the whole system:

1. Setting a Temporary Server (Session Only)
Use the following commands to route traffic temporarily for a single session(User):
export http_proxy="http://username:[email protected]:8080";
export https_proxy="https://username:[email protected]:443";
export no_proxy="localhost,127.0.0.1,::1"
You may also add:
export all_proxy="socks5://username:[email protected]"
After this, the variables will be set when the user opens a new session each time. This is a good way to Linux set proxy environment variable on a per-user basis without affecting other services. The settings will be cleared once you are done with your session or a system reboot.
2. Setting a Persistent Server for a Single User
You need to still export environment variables such as http_proxy, https_proxy for using command-line tools for both methods. Here is how to set proxy in Linux permanently:
You need to add them to your config file, typically ~/.bashrc, ~/.zshrc, or ~/.bash_profile.
Add the export commands (see above).
Open the file with nano ~/.bashrc. Add the same export lines as above and apply the changes using source ~/.bashrc.
Remove username:password@ if authentication isn’t required.
3. System-Wide Configuration (All Users)
To configure intermediary servers that apply across all users and services, modify the /etc/environment file:
sudo nano /etc/environment
Then add the following commands we already mentioned in the previous stages:
http_proxy="http://username:[email protected]:8080";
https_proxy="https://username:[email protected]:443";
no_proxy="localhost,127.0.0.1,::1"
You can save and exit to apply the changes. To apply it immediately, either reboot the system or use:
source /etc/environment
These Linux set proxy environment variables will now be available to all users and system services that source this environment file at login or boot. This is useful when you are managing a headless server or want consistent Linux proxy configuration across all users.
4. How to Check Proxy Settings in Linux Command Line
Once configured, verify it using:
env | grep -i proxy
This shows the active variables for intermediaries. If nothing is returned, then your configuration might be missing or incorrect.
You could use this command for more specific checks, such as whether apt is using it:
cat /etc/apt/apt.conf.d/95proxies
You can remove or update the above lines if you want to later change them.
Some applications rely on their own config files or command-line options for support. In this section, we are going to look at how to set a proxy in Linux for specific applications such as APT, Wget, and Git.
Advanced Package Tool, or APT, is the default package manager for Debian and Ubuntu OS. You will need to route APT’s downloads and updates through an intermediary service if you are within a firewall or an unsecured network.
To configure an intermediary for APT, create or edit a configuration file using:
sudo nano /etc/apt/apt.conf.d/95proxies
Add the following lines:
Acquire::http::Proxy "http://username:[email protected]:8080/";
Acquire::https::Proxy "https://username:[email protected]:443/";
Save and exit. APT will now use the specified intermediary for all apt update, apt install, and related commands.
Wget is a popular Linux command-line tool for downloading files from the Internet. It supports HTTP, HTTPS, and FTP protocols. It also reads configuration from both environment variables and a personal config file.
Option 1: Use Environment Variables
Use the environment variables configured earlier, then run:
wget http://example.com/file.zip
Option 2: Permanent Configuration
To make the settings permanent, edit your ~/.wgetrc file:
nano ~/.wgetrc
Add the following:
http_proxy = http://username:[email protected]:8080/
https_proxy = https://username:[email protected]:443/
Now, wget always uses your Linux set proxy server configuration without needing to export variables.
Git is required in a corporate environment to communicate with a server. Here is how to configure Linux proxy settings for Git:
Step 1: Set Git Proxy
Use this command to configure the Git server globally or as per the repository:
git config --global http.proxy http://username:[email protected]:8080
git config --global https.proxy https://username:[email protected]:443
Step 2: Unset the Option (if needed)
Use the following command to remove the server:
git config --global --unset http.proxy
git config --global --unset https.proxy
You can remove the “--global” prefix and run the command to disable it only for a single project.
Some applications might still not work even after applying the Linux proxy settings. Here are some methods to verify it:
1. Check variables
Refer to the earlier section for how to verify active environment variables.
2. Use Curl for outbound connections
To test for outbound connections using curl, use the following command: curl -I http://example.com
This should return an HTTP 200 or 301 status code with headers if it is working. If it doesn’t, then the connection isn’t being routed properly.
To test for HTTPS:
curl -I https://www.google.com
You can also test through a specific server directly using:
curl -x http://proxy.example.com:8080 https://ifconfig.me
If it returns the IP of the intermediary's server, then it is working fine.
3. Test with Wget
You can test with wget by downloading a file in the command line:
wget http://example.com/testfile.zip
Wget will display a timeout, 403 error, or connection refused message if it is not configured correctly.
4. Use Web-Based IP Check Tools
You can also use web-based IP check tools to verify your Linux proxy settings, like:
https://whatismyipaddress.com
https://ifconfig.me
If the IP shown in the check is different from your real IP, then it is active.
5. Check Outgoing IP Using a Script
You also need to verify if the scripts or automation tools are using the server. You can test this by running a shell script, such as:
export http_proxy="http://proxy.example.com:8080";
export https_proxy="http://proxy.example.com:8080";
echo "Your public IP through proxy:"
curl -s https://ifconfig.me
Save it as check_proxy.sh and give it execute permissions:
chmod +x check_proxy.sh
./check_proxy.sh
If the result matches the IP of your proxy, then the problem is solved.
6. Server Logs or Access Control Reports
For proxies that support logging, like Squid, you can use the following command:
sudo tail -f /var/log/squid/access.log
Try accessing a website and see if it gets logged in the log file. If it does, then it works successfully.
Here, we will highlight the problems you might face that wasn’t mentioned in the previous sections:
Problem 1: Variables Not Persisting
For persistent settings, ensure environment variables are added to your shell config.
Problem 2: Applications Not Using Server
Not all apps use system or shell environment variables. You can fix this by configuring each application individually. For example:
You can refer to the earlier section on Linux proxy configuration for specific applications for exact file paths and formats.
Problem 3: Authentication Fails
Sometimes, the server requires a username and password, but it's not properly formatted. To fix this, you need to add the credentials in the URL:
http://username:[email protected]:8080
Problem 4: DNS Issues: Leaks or Resolution Failures
In some cases, DNS queries may bypass your proxy and go directly through your ISP, leading to privacy leaks or incorrect IP detection. This is especially common when using SOCKS without proper DNS tunneling.
To avoid this:
Use socks5h:// instead of socks5:// to ensure DNS requests are routed through the intermediaries:
curl -x socks5h://proxy.example.com:1080 https://ifconfig.me
For broader system compatibility, configure your system to use external DNS resolvers by editing /etc/resolv.conf:
nameserver 1.1.1.1
nameserver 8.8.8.8
Optionally, combine proxy use with a VPN to enforce DNS encryption and reduce leakage risk.
Problem 5: Ignores Bypass Rules
The no_proxy or NO_PROXY environment variable is misconfigured, which causes requests from internal servers to still go through the proxy. But actually, they shouldn’t.
You can fix this by double-checking your no_proxy value using:
export no_proxy="localhost,127.0.0.1,::1,*.local,192.168.0.0/16"
Make sure that no_proxy matches the domain names or IP ranges exactly. If you are using it continuously, update this in ~/.bashrc or /etc/environment as well.
Problem 6: Authentication Fails Silently
If you are using a service that requires authentication, some command-line tools will not connect without showing any error messages. Make sure you are using the correct syntax in your export or config file to fix this.
http_proxy="http://username:[email protected]:8080";
If your password includes special characters (like @, #, or &), you need to URL-encode them. Alternatively, use .netrc files or config files that support credential separation.
The right Linux proxy settings configuration can make sure you have more control over your network, even if it's a Ubuntu OS or a headless server. You can use the GUI or command-line for a more hands-on approach. Verify the settings after each change to ensure it’s active for your use. For specific applications like Wget or Git, dedicated guides help simplify setup: Wget proxy and Git proxy.
