IPv4
From $0.72 for 1 pc. 37 countries to choose from, rental period from 7 days.
IPv4
From $0.72 for 1 pc. 37 countries to choose from, rental period from 7 days.
IPv4
From $0.72 for 1 pc. 37 countries to choose from, rental period from 7 days.
IPv6
From $0.07 for 1 pc. 14 countries to choose from, rental period from 7 days.
ISP
From $1.35 for 1 pc. 23 countries to choose from, rental period from 7 days.
Mobile
From $14 for 1 pc. 19 countries to choose from, rental period from 2 days.
Resident
From $0.70 for 1 GB. 200+ countries to choose from, rental period from 30 days.
Use cases:
Use cases:
Tools:
Company:
About Us:
Git is a distributed version control system designed for source code management and collaborative development. When working with remote repositories like GitHub or GitLab – or when downloading additional tools and extensions – issues may arise due to network restrictions, traffic filtering, or geoblocking. In these cases, configuring Git proxy can ensure stable connectivity, protect data, and help bypass restrictions often faced by remote teams or international projects.
Restrictions on direct access to internet resources when working with Git can occur for various reasons:
In these situations, intermediary servers provide a solution that allows you to:
Thus, access restrictions due to security policies or network conditions make such servers essential. They not only help bypass barriers but also deliver stable, secure, and flexible operations. If Git uses a proxy it is highly effective for teamwork and process automation in distributed infrastructures.
There are several ways to set up Git with proxy. Each is suited to specific needs and depends on network architecture, restriction levels, and the protocol type (HTTP/HTTPS, SOCKS).
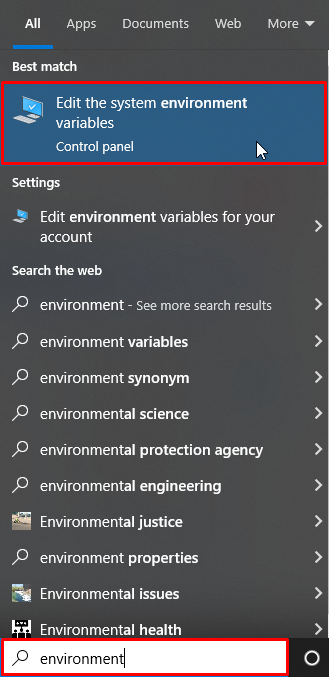
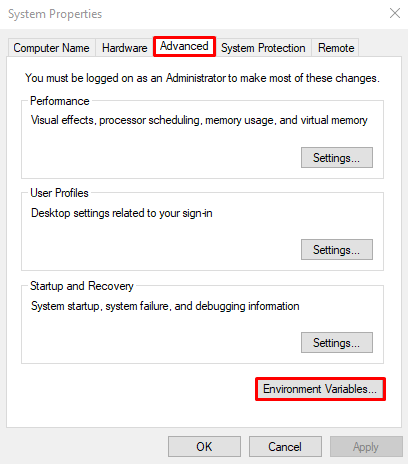
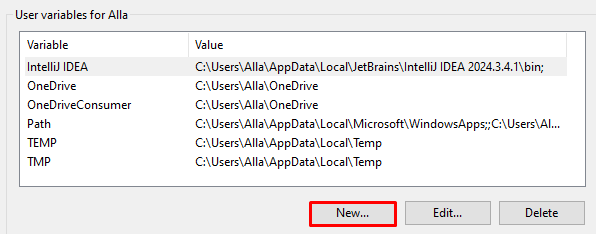
The easiest way to add a proxy to Git is to set parameters in environment variables.


Save changes and restart your system.
When configuring it via environment variables, you can specify the server’s address and port but not username and password. If you’re using a private solution, opt for IP-based authentication – this allows connection without entering credentials.
If the proxy is only needed for Git, use dedicated commands.
Navigate to your project folder and enter:
git config http.proxy
http://proxyUser:[email protected]:port
Where:
This command works for both HTTP and HTTPS – just specify the required protocol.
To remove the proxy from Git, use: git config - global -unset http.proxy.
There are several ways to verify your configuration:
git config --get http.proxy
git config --get https.proxy
If correctly configured, you’ll see the newIP address and port in the console.
git clone https://github.com/example/repo.git
GIT_TRACE=1 GIT_CURL_VERBOSE=1 git clone
https://github.com/example/repo.git
Checking your Git proxy setup using the above methods is important, as it allows you to quickly and accurately determine whether a server is in use, whether it is working correctly, and whether it is interfering with access to external resources.
When working through an intermediary, Git connections over HTTP(S) are often blocked by corporate policies or require constant authentication, especially with two-factor authentication or restricted token access. In such cases, using an SSH connection proves to be a more reliable and flexible solution. Git allows SSH traffic to be routed through a proxy using tools like ProxyCommand, netcat, or system proxy software.
Global Git proxy configuration via SSH is done in several steps:
notepad ~/.ssh/config.
For Linux and macOS:
nano ~/.ssh/config
vim ~/.ssh/config
gedit ~/.ssh/config
Note: The config file is hidden. To view it in a file manager, you may need to enable hidden files.
Host github.com
Hostname github.com
User git
IdentityFile /path/to/your/private/key
ProxyCommand nc --proxy-auth user:password --proxy proxy_ip:proxy_port %h %p
Replace /path/to/your/private/key with the path to your private SSH key. Specify the following details:
Without authentication, a private proxy will not work. Alternatively, you can use it with IP-based authentication, in which case you do not need to specify the --proxy-auth parameters.
To configure SSH for a specific project, follow these steps:
git config core.sshCommand "ssh -i /path/to/your/private/key -o 'ProxyCommand nc --proxy-auth proxy_user:proxy_password --proxy proxyserver_ip:proxyserver_port %h %p'"
As with the global setup, you need to replace:
Before running the command, ensure your proxy server settings are correct and that there are no exceptions in your firewall.
When working with a version control system through an intermediary, you may encounter connection, authentication, or data transfer errors. Below are the most common issues and their solutions.
If you run git clone or git fetch and notice that the intermediary server is not being used, you should check that your parameters are correct.
To view your proxy server configuration, use:
git config --global --get http.proxy
git config --global --get https.proxy
A common proxy error is 407 or “Proxy Authentication Required.” The solution is simple—reset your credentials. In the program console, enter: git config --global http.proxy http://user:[email protected]:port, where you specify your username, password, host, and port.
If your computer runs Linux or any other Unix-like OS, you can export the connection parameters as environment variables:
export http_proxy=http://user:[email protected]:port
export https_proxy=http://user:[email protected]:port
Note: Do not use username and password in open scripts or where files are accessible to other users.
SSL certificate problems often occur during repository cloning. To fix this, make sure system certificates are up to date or add them to trusted ones. If the issue persists, you can disable certificate verification (not recommended) either only for cloning or globally for all projects:
GIT_SSL_NO_VERIFY=true git clone /path/to/repo – Disable verification during clone.
git config --global http.sslVerify false – Disable verification globally.
If the version control system defaults to a non-standard port (for example, port 22 for SSH), this may result in blocked connections. To bypass, switch to using HTTPS instead of SSH, and make sure your program is set to use port 443.
In some cases, a corporate proxy may block certain protocols or requests, especially SSH. To work around this, use one of the following tools:
These tools help overcome network restrictions and ensure a stable connection between Git and external services.
Configuring a Git proxy server is essential for accessing remote repositories when dealing with restricted or controlled internet connections. There are several ways to achieve this – using environment variables, configuration files, or SSH. During setup, you may encounter connection issues, timeouts, or blocks, which can be easily diagnosed with special commands and resolved by switching to port 443, using special applications, or a personal token. Taking all of this into account, you can properly configure your version control system for secure network access and data exchange.
