IPv4
From $0.72 for 1 pc. 37 countries to choose from, rental period from 7 days.
IPv4
From $0.72 for 1 pc. 37 countries to choose from, rental period from 7 days.
IPv4
From $0.72 for 1 pc. 37 countries to choose from, rental period from 7 days.
IPv6
From $0.07 for 1 pc. 14 countries to choose from, rental period from 7 days.
ISP
From $1.35 for 1 pc. 23 countries to choose from, rental period from 7 days.
Mobile
From $14 for 1 pc. 18 countries to choose from, rental period from 2 days.
Resident
From $0.70 for 1 GB. 200+ countries to choose from, rental period from 30 days.
Use cases:
Use cases:
Tools:
Company:
About Us:
Jarvee is a popular automation platform that helps marketers and businesses manage and expand their social media activity across platforms like Facebook, Instagram, Twitter, LinkedIn, YouTube, Pinterest, and Tumblr. By scheduling posts, automating follows, and increasing engagement, this tool helps streamline repetitive tasks. However, performing these actions directly from your own IP address can lead to limitations or account suspensions. To avoid detection and maintain account safety, it is necessary to complete a proper Jarvee proxy setup.
A Jarvee proxy setup masks your real IP address and assigns unique ones to each managed account. This helps your automation appear as normal user activity, reducing the likelihood of account restrictions. For example, when using proxies for Twitter or Instagram, each account appears to come from a unique connection, protecting them from being linked together.
Below, you’ll find which intermediary types work best with this platform, how to configure them step by step, and practical recommendations for smooth performance.
Not all of the intermediaries perform the same when used with automation tools. The right type determines whether your accounts run smoothly or encounter limitations. For Jarvee, the types categories are the most relevant:
They route traffic through genuine residential IP addresses supplied by internet service providers (ISPs). They are reliable because social media platforms treat them as authentic user connections. Residential proxies work effectively with this tool, especially when managing high-value accounts on strictly monitored platforms such as Instagram or Facebook.
Datacenter IPs are hosted on servers and not associated with physical residential addresses. They are usually cheaper and faster than residential servers, but they are also more likely to be flagged since they are widely used for automation. If you use datacenter IPs with Jarvee, make sure they are from a reputable provider with low detection rates.
These combine the best features of datacenter and residential servers. They are hosted in data centers but registered with ISPs, which makes them appear as genuine household connections. For this tool, ISP ones offer speed and trustworthiness, providing a good balance for users who want reliable account protection.
They route traffic through mobile networks, rotating IPs assigned by carriers. They are highly secure for social media automation because social platforms trust mobile IPs and regularly see shared usage. For Jarvee, 4G/5G mobile proxies are an excellent choice when working with high-value accounts that cannot risk bans, though they are generally more expensive.
Configuring an intermediary inside this tool is a straightforward process. Follow these steps carefully to ensure the configuration is accurate. This section also shows how to configure Jarvee proxy in line with security requirements.
1. After launching, in the left-hand sidebar, locate and select the Proxy Manager section.

3. Click on the “Add Proxy” button to enter your credentials.

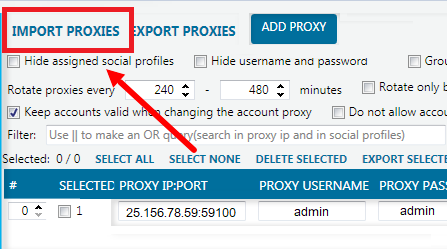
4. Fill in the required fields: IP address and port, along with the username and password provided by your new IP provider.

5. If you already have multiple intermediate servers saved in a TXT file, use the “Import Proxy” option to upload them directly. The system will automatically load them into Proxy Manager.

6. Select the social media accounts you want to connect and use the “Add” button to bind them to the chosen intermediary.

7. To ensure the new IP works correctly, click “Verify Proxy”. The app will test the connection to confirm that the server is valid and functional.

8. In the “URL to use to verify the proxies” field, type the URL of the social network you plan to automate. This ensures the server is suitable for that specific platform.

Using intermediaries in this tool correctly is just as important as setting them up. Misusing them can result in bans, poor performance, or a Jarvee proxy error. Below are practical recommendations on how to use proxies in Jarvee without issues.
Best Practices:
Remember, using a fake IP address or unreliable sources can quickly result in blocked accounts. Professional-grade servers are the only safe option for maintaining long-term performance. By applying these best practices, you can maintain safer automation and reduce the risk of platforms identifying suspicious activity.
With the right configuration, you can protect your accounts, reduce bans, and make your campaigns run smoothly. Setting up Jarvee proxies correctly, choosing the right type for your accounts, and following best practices will ensure optimal performance. Always remember that using a trusted Jarvee proxy is a necessity, not an option, when running a platform at scale. Learning platform-specific setups, such as how to set up a proxy for Reddit, can further improve your automation strategy.
